
WebForm Designer
With the form designer you can design forms according to your needs and provide them with functionality. You can display the dialog pages in one process step with HTML elements, query databases and execute Java or VB scripts. The Web Form Designer is integrated into the AristaFlow BPM Suite by default and can be started after integrating the WebForm activity into a process step.
Creation of web forms
-
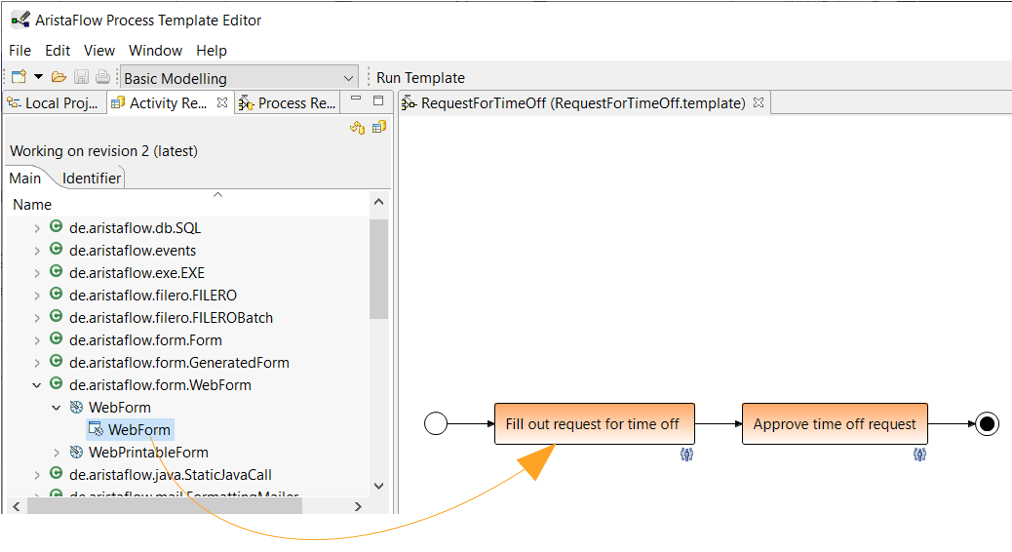
Drag and drop the WebForm activity onto a process step and click Finish on the wizard page, so that all input and output parameters are automatically integrated into the WebForm. You can also check the parameters by repeatedly clicking Next or connect them manually.
-
Select the process step and select Open in Form Designer… via the right-click menu

-
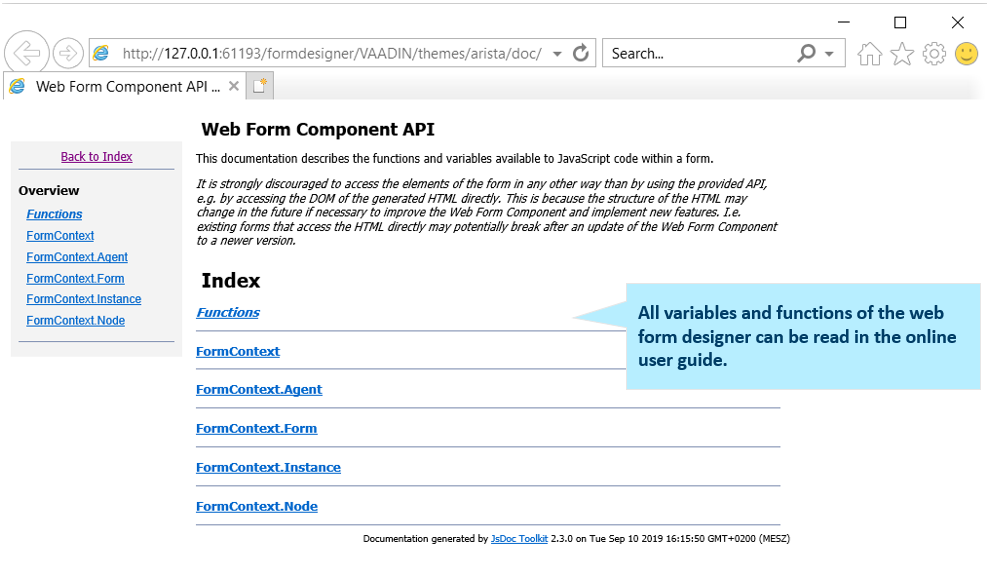
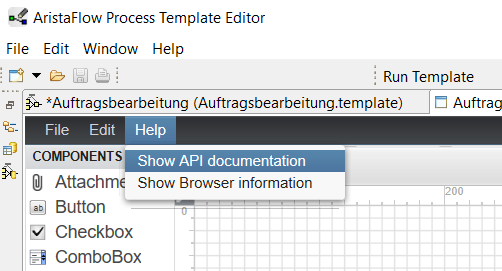
Web Form Component API
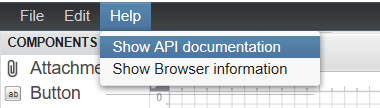
The documentation of the current JavaScript API, which can be used within forms, can be found via the Help menu in the Form Designer.
-
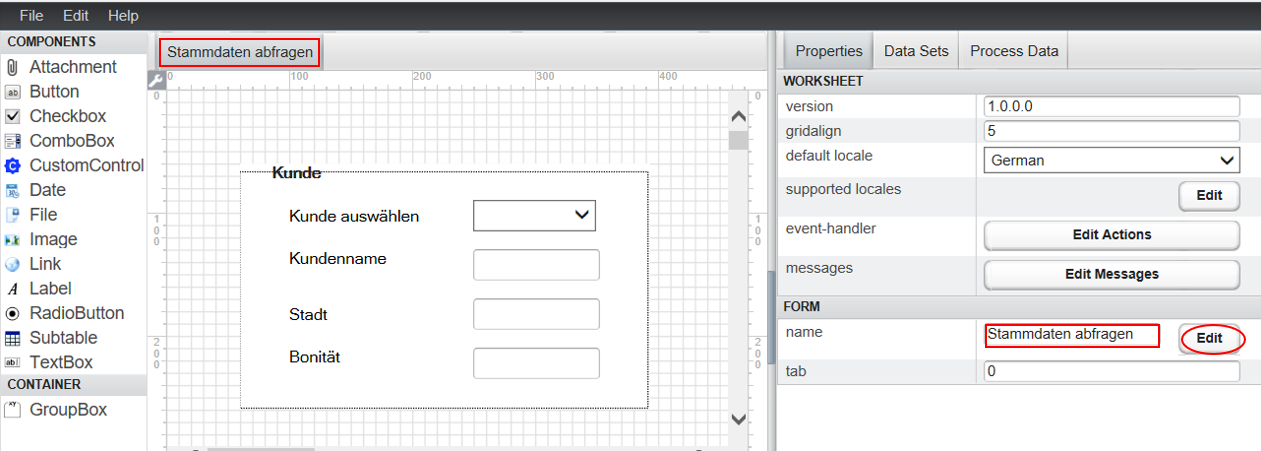
In the Designer window, the form elements are on the left and the properties that can be applied to these components are on the right. Drag and drop the elements onto the form area and design the layout directly in the form according to your requirements.
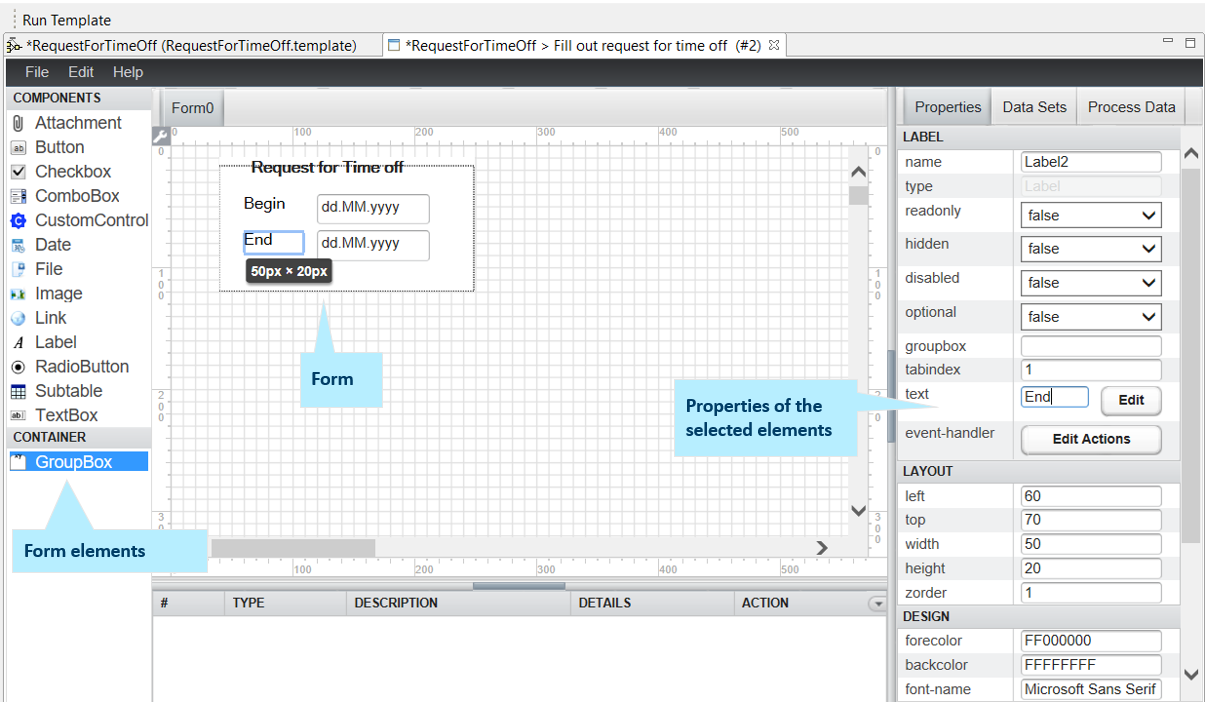 Form Designer offers various elements both for display and for user input such as labels, buttons, images, text boxes, check boxes ...
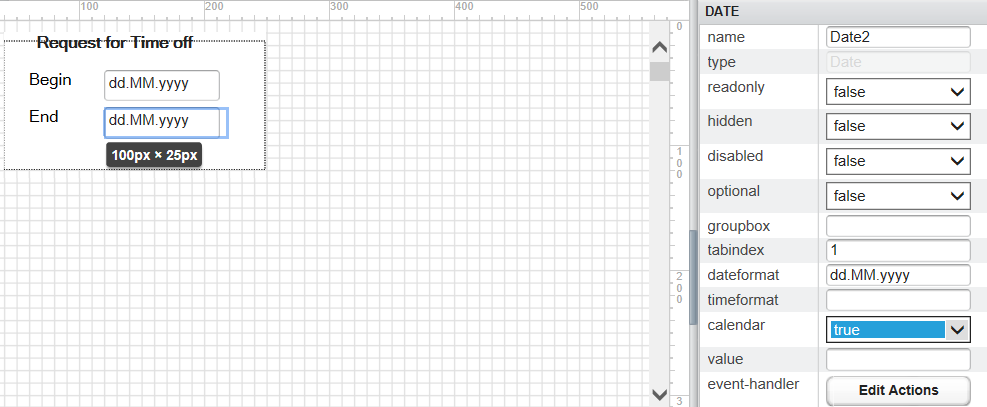
However, after inserting the elements, they must be provided with the appropriate functionality. For example, you can activate the calendar function for date fields by setting the value to true in Properties -> calendar.
Form Designer offers various elements both for display and for user input such as labels, buttons, images, text boxes, check boxes ...
However, after inserting the elements, they must be provided with the appropriate functionality. For example, you can activate the calendar function for date fields by setting the value to true in Properties -> calendar.
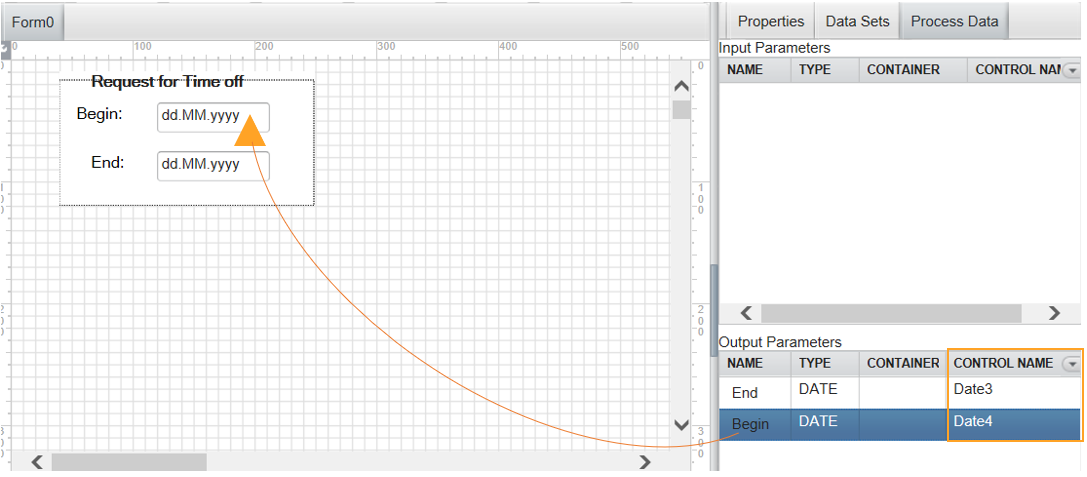
 Alternatively, you can create the input and output fields from the right using Process Data through the input and output parameters, again using drag and drop. In this case, the labels for the parameters are also created automatically. Then you can skip step 4, since the input and output parameters are already linked to the form elements.
-
The input fields must be linked to the corresponding input and output parameters (if these were not created using drag & drop from the right, i.e. using Process Data). The activity is linked to the process data via the parameters at the process step. Under Process Data you will find the input and output parameters of the current process step. To link, drag the parameters onto the corresponding field and after dropping them, the name of the field appears under Control Name (see previous image).
note
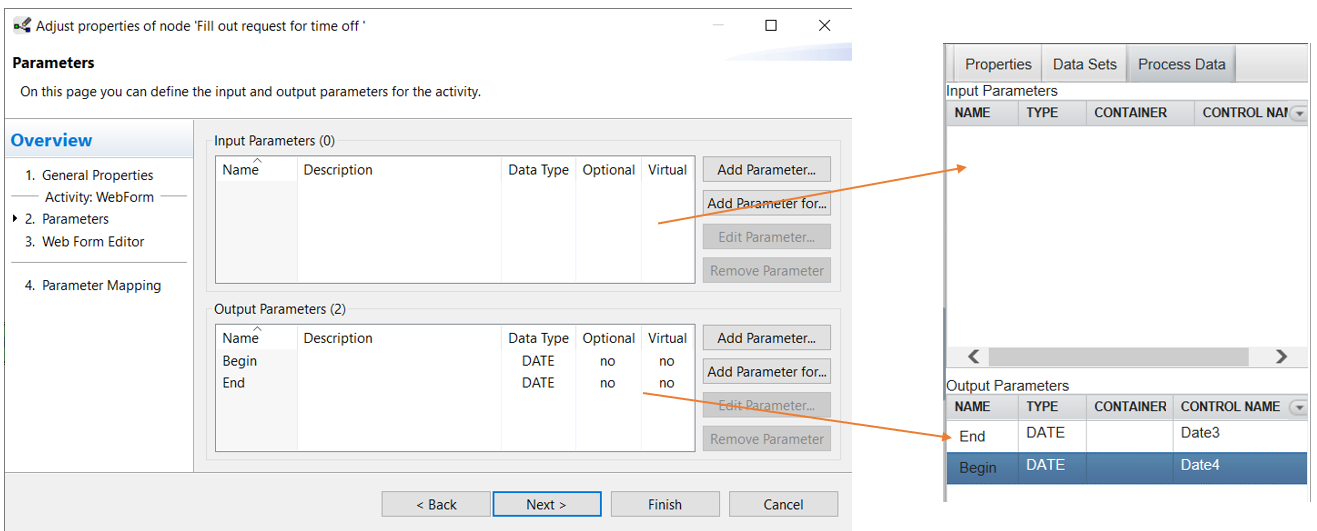
After linking an activity to a process step, you can only edit the input and output parameters via the wizard page. You can call this up by double-clicking on the step.
-
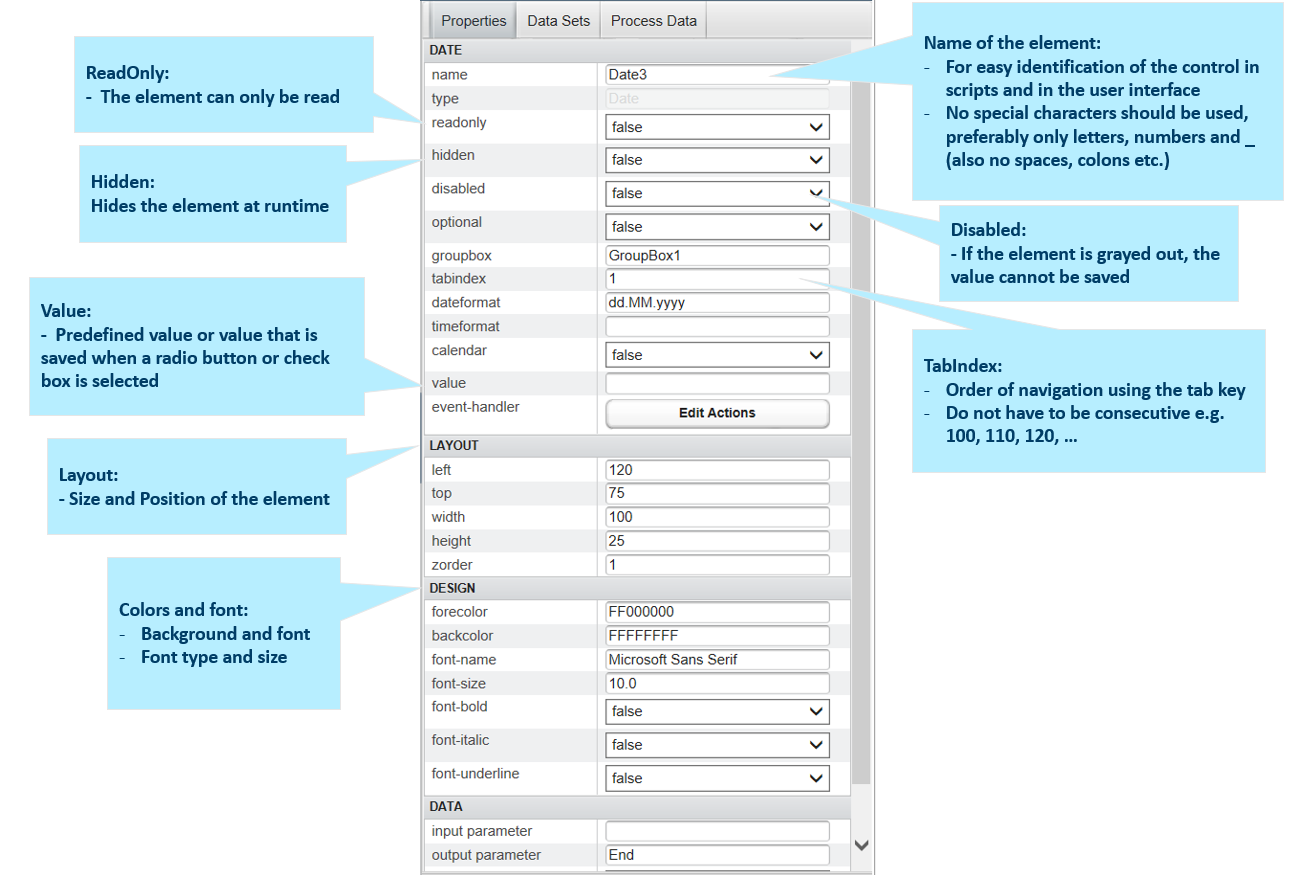
The following figure provides brief explanations of the common properties of form elements.
-
With Ctrl+S you can save the WebForm and after closing the WebForm Designer execute the WebForm in the client.
Overview of form elements (controls)
| Control | Description |
|---|---|
| Attachment | An attachment offers the option of uploading a file. |
| Button | A button can execute a defined JavaScript function |
| CheckBox | Standard check button |
| ComboBox | Drop-down menu, either with predefined values within the form or automatically filled with the results of an SQL query |
| CustomControl | Item reserved for future expansion, not covered in this document |
| Date | Date (day, month and year as well as time, also in combination). The format can be set in the properties. Can a calendar be displayed when activated, with the help of which the element can be conveniently filled. |
| File | With File, a user can download a linked file Image display in the form, e.g. for a logo |
| Label | Text |
| Link | Url |
| RadioButton | Radio buttons that can be grouped together (by giving them the same internal name) to give multiple choices. |
| SubtableView | Table (for further information see Subtables) |
| TextBox | Simple text input, the accepted format depends on the linked process input and output parameters. If a data element of the type Date is to be filled in AristaFlow, the TextBox will only accept one in the correct format (dd.mm.yy). Supports both single-line and multi-line modes. |
| GroupBox | With a GroupBox, several elements can be logically combined, for example to provide them with a frame or to show or hide them together at runtime. |
Control properties
| Control type | Description |
|---|---|
| Name | Internally assigned name of the control. The control can be referenced in JavaScript with this identifier |
| Type | Shows the type of control e.g. TextBox, Button, ... |
| Readonly | Specifies that only read access to the control is possible |
| Hidden | Hides, but does not deactivate the selected control |
| Disabled | Deactivates the control, but does not hide it ("gray") |
| Optional | Indicates whether the control has to be filled in by the user or not |
| Groupbox | Specifies the name of the enclosing group box |
| Tabindex | Defines the "jump order" of the tab key. |
| Text / Value | The label or value of the control displayed in the form |
| Alignment | Horizontal text alignment (Left, Center, Right) |
| Multiline | Indicates whether the text box is multiline |
| Event-Handler | JavaScript EventHandler - execute JavaScript functions after triggering a certain event (onChange, onUpdate, onBlur, etc.) |
| Layout | Description |
|---|---|
| Left | Distance of the control from the left edge of the form in pixels |
| Top | Distance of the control from the top of the form in pixels |
| Width | Width of the control in pixels |
| Height | Height of the control in pixels |
| Zorder | Specifies the order in which the controls are arranged on the WebForm from back to front |
| Design | Description |
|---|---|
| Forecolor | Color of the control |
| Backcolor | Background color of the control |
| Font... | Properties of the font used |
| Data | Description |
|---|---|
| Input parameter | Input parameter of the process model that is to be set as a value for the control when the process step is called |
| Output parameter | Output parameter of the process model that is given the value of the control when the process step is exited |
| Databasequery | Selection of the database query defined under "Data Sets" |
| Databasecolumn | Selection of the database column that provides the input for filling the control |
| Fillmode | "Static" for permanently defined values / "Database" for database queries |
Creating tables (subtables)
When creating tables (subtables), a distinction must be made between tables that are only used internally in the form (internal subtables) and those that are passed on to subsequent process steps via output parameters (output subtables).
Internal subtables are mainly used to display database query results. In principle, these can also be changed in the form, but the subtable as a whole is not an output parameter of the form activity. In contrast, output subtables are mapped to an output parameter of the form activity. For this reason, in addition to the graphic representation in the form, a subtable data structure must be created and linked to the graphic representation, which encapsulates the subtable as an "output object" and outputs it via the associated output parameter. To create subtables using an example process, see Realization of internal subtables and Realization of output subtables.
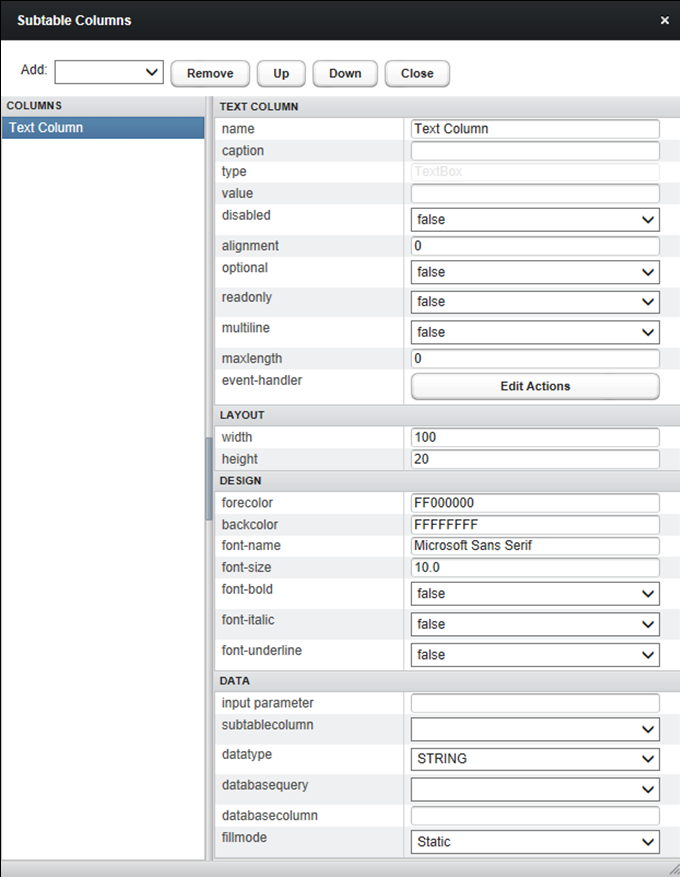
In order to be able to display information in a table, appropriate column definitions must first be created. To do this, the required columns are defined in the properties of the SubtableView control. After clicking the Edit Columns button (at the bottom of the Properties tab), the Column Editor opens, in which you can create the desired columns. The properties such as name or title are specified in the properties form of the columns. The properties described under Control type, Layout, Design and Data have the same meaning as described for normal controls Control properties.
The entries in the subtable can be made changeable if desired.
- Change of individual table values With the entry readonly (true/false) on the level of the control Subtableview you can define globally whether changes to the table content should be possible in principle or not. Which entries can actually be changed is decided at column level by setting the readonly attribute of the column to true or false.
- Insertion and deletion of rows With the entry addremove at the level of the Subtableview control you can determine whether rows can be added to or deleted from the table at runtime. (If you want to insert new rows, then (at least some) column values should be equipped with readonly = false, otherwise you can only insert empty rows). This feature can be used, for example, to record data in tabular form by adding new rows as long as items are still to be recorded.
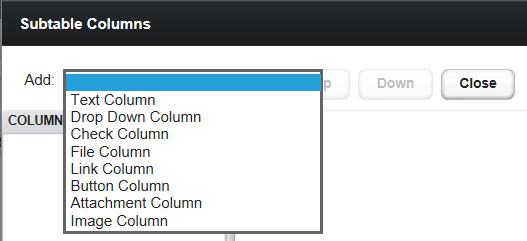
Column types for subtables
| Control | Description |
|---|---|
| Text Column | Text column that can also be written (ReadOnly = false) |
| Drop Down Column | Column with dropdown menus, the values can be edited in the properties under Data -> Static Items |
| Check Column | Checkboxes as a column |
| File Column | Button with the possibility to upload files |
| Link Column | Link to a web resource |
| Button Column | Action-free button, the functionality of which can be programmed via JavaScript |
| Attachment Column | Downloaded file |
| Image Column | Embeds images in the respective column |
Event types for controls
The WebForm Designer knows the following event types:
| Event type | Time of occurrence |
|---|---|
| onclick | Event after clicking the control |
| ondbclick | Event after double click in the corresponding control |
| onchange | Event after changing the content |
| onfocus | Event after selecting the control (e.g. using tabulator or mouse) |
| onblur | Event after leaving the control |
When an event is thrown, either another control can be reloaded using Actiontype Reload (and its registered events are then triggered) or a script can be executed using Actiontype Script. If an event type (e.g. onchange) is to trigger both reload and script events, the corresponding event is simply inserted several times in the event handler using the Add menu item in order to be able to store the different actions.
For an example with an onclick reload event see [Event-controlled DB query execution for updating controls] (../databank.de/#ereignisgesteuerte-db-anfragen-ausfuhrung-zur-aktualisierung-von-controls). For an example with an onchange reload event, see Adding events and actions to the forms.
Creation of JavaScript functions
The recommended procedure for creating a JavaScript function and assigning it to a control event is as follows: You specify the desired function in the central JavaScript window of the form (accessible via the menu Edit -> Scripts...) and then call it in the control's event handler on. This means that all JavaScript routines of the form are in one central place and one also avoids redundant code if a function has to be called by more than one control (further details on this in section Linking JavaScript functions with events and controls.
JavaScript is a programming language based on Java that can be embedded in HTML pages. You can find a clear representation of the JavaScript language elements in numerous tutorials on the Internet. (A good online source for JavaScript can be found at http://de.selfhtml.org/javascript).
The controls of the WebForm forms offer a number of methods that can be addressed in JavaScript programs. So you can e.g.
- Get or set the value of a control
- Make a control visible or hide it
- Set a control to readonly or cancel this again
- ...
The description of these methods can be found in the menu of the WebForm Designer under Help -> Show API documentation.

Handling of the "form events" onload, submit and onsuspend
Occasionally you want to do certain things when loading a form activity, such as hiding controls and subforms, calculating values or pre-assigning controls with initial values. You can usually do this using the properties of the controls, but then these actions are scattered across the entire form. For documentation and maintenance reasons, it is therefore better to pack these things into an initialization function in the central JavaScript window and to have this carried out when the form is loaded.
The processing of many interactive process steps (including WebForm form steps) can be interrupted Suspend Activity and continued at a later point in time Resume Activity. With such a suspend, any form entries are saved, but not the values of calculated fields. If, after a resume, you should automatically see the form in the state in which it was left, you have to trigger any calculations for filling controls (again) when loading the form. To do this, you specify an onload event in the form's EventHandler (on the "main level") and store the call of a corresponding function, e.g. init (), in which the individual functions to be executed are then called. For an example with a function to be called when loading a web form, see Form event: onload.
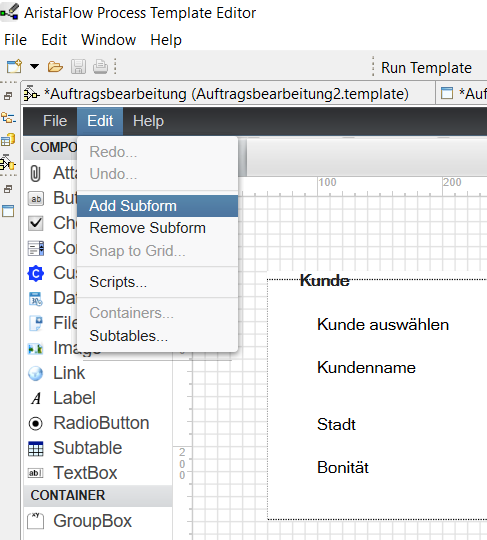
Multi-sheet forms
The WebForm-Designer also supports the realization of multi-sheet forms, whereby each sheet is addressed by its own tab at the top left. We can define the labeling of these tabs in the properties of this worksheet.
A new form worksheet is inserted using Edit -> Add Subform.
The input/output parameters for linking are also available on the other form worksheets. In other words, controls on the various form worksheets "share" the same parameter if necessary. (Do not be confused by the fact that only a link is displayed in the Process Data view; the relevant property entries for the controls are decisive!). Further details on working with multi-sheet forms can be found in the section Working with sub-forms.
Handling parameters of the type USERDEFINED subtable
AristaFlow has a number of predefined "extended data types" in order to be able to deal with non-elementary data types as input or output parameters if necessary. They belong to the type category USERDEFINED and are each implemented as Java classes.
The description of these Java classes with their class and object methods can be found in every AristaFlow BPM Suite Release under the name aristaflow-javadoc-all. It can be viewed as online documentation via the AristaFlow GmbH download server. To do this, click on this link https://pubweb.aristaflow.com/temp/res/Chronos/javadoc/.
The type USERDEFINED subtable belongs to these extended AristaFlow data types. Its description can be found under Class WebFormSubtable and can be accessed via the packages de/aristaflow/adept2/extensions/datatypes.
USERDEFINED subtable as input parameter type of a WebForm activity
In order to be able to read an input parameter of the type USERDEFINED subtable into a SubtableView in a WebForm activity and, if necessary, edit it there, one proceeds in the same way as if one would like to output the subtable as an output parameter (see section Realization of output subtables), only that when defining the subtable data structure you now have to make sure that the attribute names used there are exactly the same as in the input Subtable structure can be selected because the assignment is made "by name". With regard to the data types, you have a little more freedom here, but for reasons of traceability, it is better to choose them identically. With regard to the design of the table (SubtableView) displayed in the form, you are free again, as the assignment of the columns of the Subtable data structure to the columns of the SubtableView is again made explicitly (and possibly also selectively). For details see section Realization of output subtables.
Further processing of USERDEFINED subtable output parameters
The WebFormSubtable class provides a whole arsenal of methods for handling Java objects of the type USERDEFINED subtable in a scripting activity or a conventional Java program. So you can e.g.
- Get the attribute names (getColumnNames())
- Determine the number of table rows (getRowCount())
- Targeted access to table lines and their elements (getValue(…))
- Remove individual rows from the table (removeRow(...))
In the section order entry we use an example to show the handling of subtable objects using scripting activity.